TL;DR
A closet can serve as a surprisingly good space for voiceover or AI rigs if you focus on placement and treatment. Prioritize distance, use barriers, and ensure proper ventilation to keep noise in or out. Foam alone won’t cut it—think of it as part of a bigger picture.
Ever wondered if your tiny closet can double as a legit recording booth or quiet AI rig space? The truth is, with the right approach, it absolutely can. Most DIY setups focus on stuffing foam or blankets everywhere, but understanding acoustic dampening, placement, and the ‘Rig in the Closet’ setup can make a big difference. But the real game-changer? Placement and ventilation. These strategies turn a cramped closet into a focused sound zone—and often, a lot cheaper than building a dedicated room.
In this guide, I’ll break down how to create a cozy, quiet corner for your voiceovers, podcasts, or AI rigs. We’ll cover the difference between dampening and soundproofing, smart placement tips, and how to keep heat from turning your closet into a sauna. Ready? Let’s turn that tiny space into your new favorite studio.
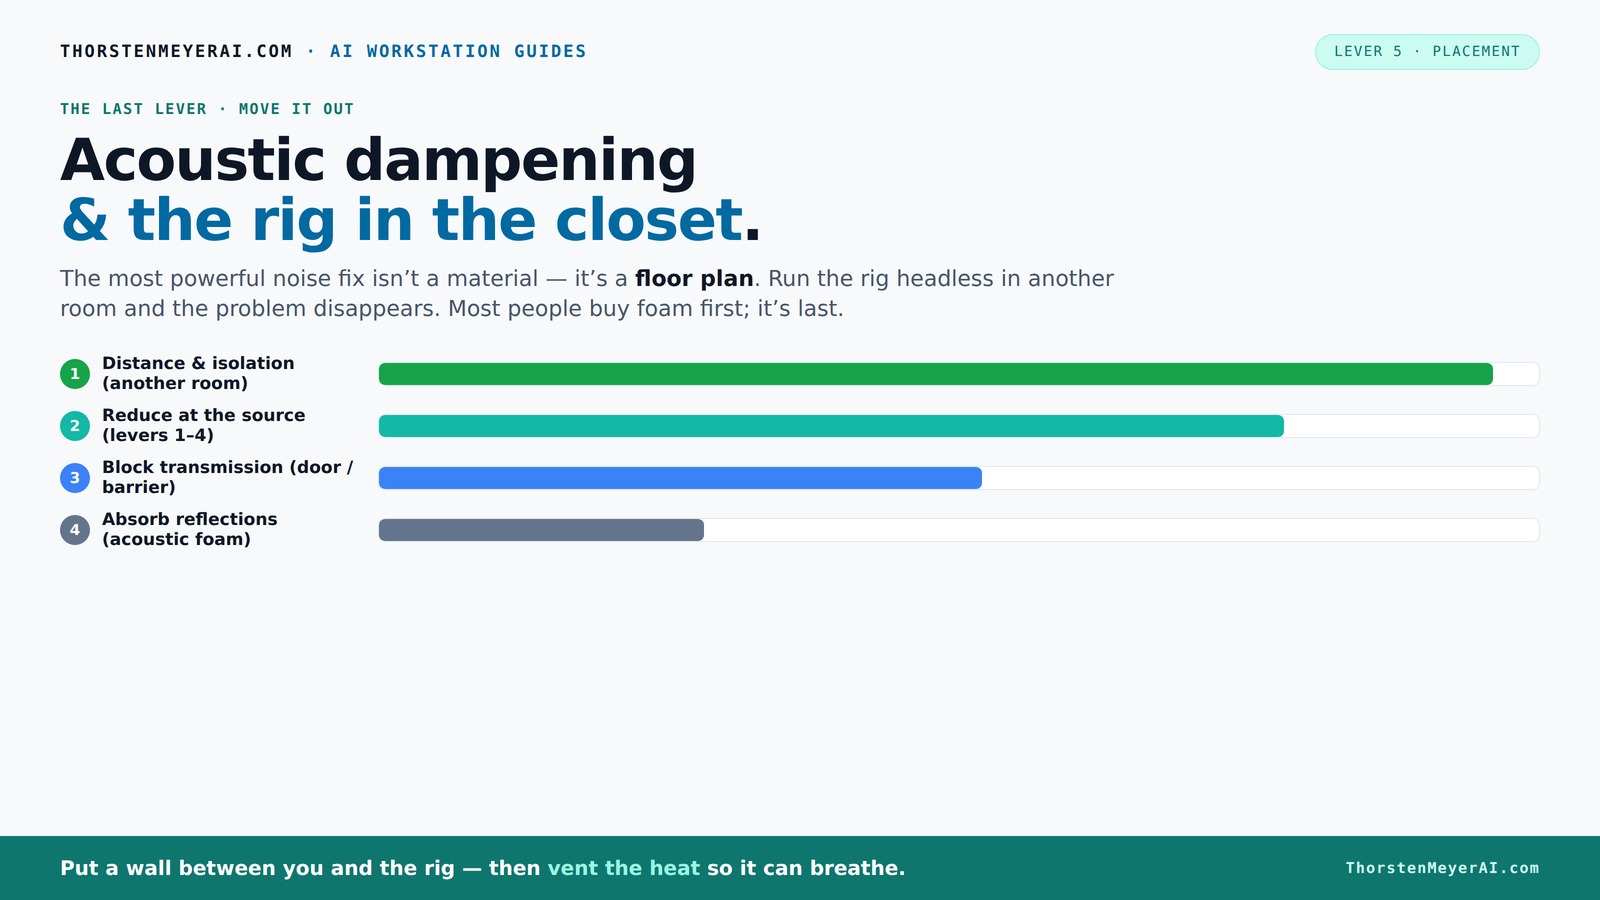
Acoustic dampening
& the rig in the closet.
The most powerful noise fix isn’t a material — it’s a floor plan. A rig you can’t hear because it’s in another room beats any amount of foam. Tap the approaches in Part 1 to see what actually works.
(another room)
(levers 1–4)
(door / barrier)
(acoustic foam)
Contain the noise, not the heat
Key Takeaways
- A closet can serve as a highly effective acoustic space if you focus on reflection control and ventilation.
- Prioritize placement—mic positioning and reflection points—over filling the space with foam or blankets.
- Proper sealing around the door and corners prevents sound leaks and bass buildup.
- Ventilation is critical—use quiet fans or ducting to avoid overheating your rig.
- Don’t overdo treatment; balance absorption with the room size and your recording goals.

Focusound 52 Pack Acoustic Foam Panels 1" x 12" x 12" Sound Proof Foam Panles Soundproofing Noise Cancelling Wedge Panels for Home Office Recoding Studio with 300PCS Double-Side Adhesive
- Soundproofing Design: Triangular grooves for noise absorption
- Includes Adhesive Tape: 300pcs double-sided adhesive for easy installation
- Easy Shape Recovery: Soak in water to restore foam shape
As an affiliate, we earn on qualifying purchases.
As an affiliate, we earn on qualifying purchases.
Why a closet is more than just a makeshift studio
Think of a closet not just as a storage space, but as an *acoustic control zone*. Its small size and dense walls help reduce echoes and reflections. This makes it ideal for capturing clear vocals or running a quiet AI rig. But it’s not just about making it sound good—it's about understanding what a closet can and can't do.
For example, a closet filled with clothes dampens high frequencies, creating a warm, focused sound. It’s like a natural acoustic chamber. However, without proper treatment, it can also cause bass buildup or make your voice sound boxy. The trick is to treat *reflection points* and avoid sound leaks through gaps and the door.
Recent trends show many creators turning closet spaces into hybrid studios, blending DIY absorption with smart placement. You might also find helpful tips in this aromatherapy and wellness site about creating a calming environment. It’s a flexible, inexpensive way to tame noise and improve sound quality—without tearing down walls or blowing your budget.
Acoustic dampening vs. soundproofing — what's the real difference?
Acoustic dampening is about reducing echoes, flutter, and reflections inside a space. It makes your voice sound less boomy and more professional. Soundproofing, on the other hand, aims to prevent sound from leaking out or coming in—keeping noise contained.
For example, hanging blankets or foam panels inside your closet will absorb reflections, making vocals clearer. But if you want to block noise from your neighbors or prevent sound from escaping, you need barriers like sealed doors and soundproof panels.
Understanding this difference helps you choose the right materials and setup. For more on sound treatment options, check out acoustic dampening and setup tips. Most closet studios focus on dampening to improve sound quality, not full soundproofing—although sealing gaps and using barriers can help keep noise in or out.
It’s important to recognize that achieving complete soundproofing in a closet is extremely challenging without major modifications. Instead, focus on balancing dampening and sealing to get a cleaner sound and reduce noise bleed, knowing that some sound leakage might still occur. This tradeoff often means sacrificing absolute isolation for practical improvements that suit home environments.
Where to put your mic for the best sound in a tiny closet
Place your microphone at the *reflection point*—the spot where sound bounces off the wall behind the mic. Typically, this is about 6–12 inches in front of a wall. Use a mirror to find the spot behind the microphone that reflects your voice back to it, then treat that area.
For example, if you’re recording vocals, position the mic so it faces away from reflective surfaces. Keep it a few inches from clothing, blankets, or foam to reduce comb filtering and flutter echo.
Most DIY setups recommend a *close-mic* approach—keeping the mic within 3–6 inches of your mouth—while treating the reflection points around it. This creates a tight, focused sound with minimized room influence.
Choosing the right mic placement isn’t just about proximity; it’s about understanding how sound interacts with your space. Moving the mic even a few inches can drastically change the tone and clarity. For detailed mic placement strategies, see this wellness site that discusses optimal recording setups. Experimenting with different positions and reflection point treatments will help you find the optimal setup for your specific closet's acoustics.
What coverage do you really need? Foam, blankets, and bass traps explained
In a small closet, coverage makes all the difference. Thicker panels—around 2 inches—absorb lower frequencies better, preventing a boomy, boxy sound. Covering the walls, ceiling, and especially corners helps tame standing waves and bass buildup.
For example, a DIY booth might use foam panels on the walls, a blanket on the door, and bass traps in the corners. This combo reduces flutter echoes and low-end resonance.
However, it’s crucial to understand that more coverage isn’t always better. Over-absorbing can make your space sound dull and lifeless, reducing clarity and presence. The goal is to strike a balance—using enough treatment to control problematic reflections and bass, but not so much that the room becomes overly dead. Consider your specific needs: if you record spoken word, focus on reflection points; if you’re recording music, bass traps become more important. Experimentation and listening tests are key to finding the right mix.
Tradeoffs exist: too much absorption can rob your recordings of vitality, making them sound flat or muffled. Conversely, too little can leave echoes that muddy your sound. The key is to understand your priorities and room characteristics, then tailor your treatment accordingly.
Sealing the door and treating gaps — the weak spots
The door is often the biggest leak point for sound. For practical tips on sealing gaps and improving sound isolation, see this article on acoustic sealing. Even a tiny crack can let in or escape a lot of noise. Seal gaps with weatherstripping, acoustic sealant, or hang a heavy blanket over the door.
For example, applying weatherstripping around the door frame and hanging a dense curtain can cut noise leaks by up to 50%. This simple fix dramatically improves the room’s sound isolation.
If you’re serious about blocking sound, consider creating a 'door plug'—a DIY panel that fits snugly into the doorway, acting like a makeshift barrier. It’s a cheap, effective way to contain sound.
Keep in mind that gaps around the door not only let sound escape but also allow unwanted noise in, such as street sounds or household activity. Proper sealing enhances the effectiveness of your acoustic treatment and helps maintain a consistent sound environment. Addressing gaps prevents sound from leaking out and unwanted noise from entering, which can otherwise compromise your recordings and overall acoustic control. This step often yields significant improvements with minimal effort, making it a critical part of your setup.
Ventilation tricks: keeping your rig cool without noise leaks
Putting a high-power machine in a sealed closet traps heat, risking thermal runaway. The key is ventilation—hot air must escape, and cool air must circulate. Use a quiet exhaust fan or ducted ventilation system to keep temperatures down.
For example, installing a low-noise fan and ducting it outside can maintain a stable temperature without adding noise to your space. Active ventilation systems with thermostatic control prevent overheating while minimizing sound leaks.
Managing heat isn’t just about comfort; it’s about protecting your gear and maintaining optimal performance. Overheated components can throttle or fail prematurely, and excess heat can also increase background noise if fans or cooling systems are noisy. Using quiet, dedicated ventilation solutions ensures your rig stays cool without compromising your sound environment. Remember, good heat management often requires a balance—adequate airflow without introducing noise or drafts that could affect your recordings.
It’s important to understand that proper ventilation isn’t just about noise; it’s about maintaining a stable, safe environment for your equipment. Overheating can lead to hardware failures or degraded performance, which ultimately affects your work quality. The tradeoff is finding a solution that provides sufficient airflow while remaining whisper-quiet, ensuring your setup stays cool and your recordings remain clean.
Putting it all together: your step-by-step closet setup
- Identify the best spot for your mic—aim for the reflection point.
- Treat the reflection points with foam or blankets—cover walls, ceiling, and corners.
- Seal gaps around the door—weatherstripping and blankets work wonders.
- Set up ventilation—install a quiet exhaust fan or duct system.
- Test and tweak—listen for echoes or leaks, then adjust coverage accordingly.
For example, start with foam panels on the walls, hang blankets over the door, and duct a quiet fan outside. Adjust placement until your recordings sound clear and your rig stays cool.
Common pitfalls and how to avoid them
Don’t over-treat small spaces—too much absorption can dull your sound. Avoid treating only one wall, which can make your recordings uneven. Remember, the goal is balanced control, not complete deadening.
Be cautious about sealing the closet completely without ventilation. Overheating can damage your gear and compromise safety. Always include a way for hot air to escape.
Finally, don’t forget about the door. Gaps here are some of the easiest leaks. Seal them well, or your efforts will be wasted.
Additionally, be aware of the tradeoffs involved in sealing and treatment. While sealing gaps improves isolation, it can also trap heat and humidity, which might affect your equipment or create mold issues over time. Regularly check your setup to ensure proper airflow and ventilation. The goal is to find a practical balance—achieving sufficient sound control without sacrificing safety or comfort. Consider that some tradeoffs, like increased heat or humidity, may require additional measures such as dehumidifiers or periodic ventilation checks to ensure your environment remains safe and effective.
Frequently Asked Questions
Can a closet really work as a recording booth?
Yes, small closets can be surprisingly effective for recording vocals or voiceovers, especially with proper reflection control and sealing. They won’t beat a dedicated studio, but they’re a practical, inexpensive solution for many creators [4][7].What’s the difference between acoustic dampening and soundproofing?
Acoustic dampening reduces echoes and harsh reflections inside a space, making recordings sound cleaner. Soundproofing prevents sound from escaping or entering, blocking noise leaks. Most closet setups focus on dampening, with some sealing gaps for better isolation [3][5].Where should I place the mic in a closet booth?
Position your mic at the reflection point—usually 6–12 inches from the wall behind it. Use a mirror or experiment to find the spot where sound bounces directly back. Keep the mic close to your mouth for a tight, clear sound [4][6].How much foam, blankets, or paneling do I need?
Coverage depends on your goals, but generally 2-inch panels on walls and corners suffice for small spaces. Use blankets or lightweight panels for quick fixes. Balance treatment to avoid a dull or overly dead sound [4].How do I stop sound from leaking through the door?
Seal gaps with weatherstripping or acoustic sealant. Hang a heavy blanket or DIY door plug for extra containment. These simple steps cut leaks significantly and improve isolation [3][5].Conclusion
Transforming your closet into a quiet studio isn’t about throwing foam everywhere. It’s about smart placement, targeted treatment, and good ventilation. When you treat the reflection points, seal gaps, and manage heat, that tiny space becomes a powerful tool for clean recordings or a silent AI rig.
Imagine a corner so quiet you forget your rig’s even there—just crisp vocals or smooth inference. That’s the real win. Your closet isn’t just storage anymore; it’s a secret weapon.