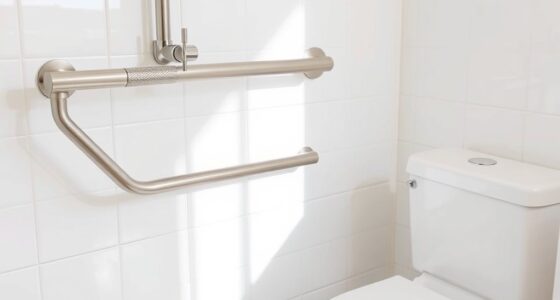
Installing grab bars in your bathroom greatly enhances safety and prevents falls. Start by locating and marking wall studs using a stud finder. Position vertical bars 32-38 inches above the floor and horizontal bars at 36-38 inches within the shower. Secure them with stainless steel screws, ensuring they penetrate the studs for strength. Seal any seams with silicone caulk and test the bars for stability. Want to know more about each step? Keep going to explore further details.
Key Takeaways
- Use a stud finder to locate and mark wall studs for secure grab bar installation.
- Position vertical grab bars 32 to 38 inches above the floor at shower/tub entrances.
- Choose horizontal grab bars to install 36 to 38 inches above the finished floor in the shower.
- Secure grab bars with No. 10 or 12 stainless steel screws, ensuring they penetrate at least 1 inch into the studs.
- Seal seams with silicone caulk and allow it to dry before testing the grab bar's strength.

TAILI Grab Bars for Bathtubs and Showers 2 Pack Suction Grab Bar, Heavy Duty Shower Handle Removable Bath Handrails for Seniors and Elderly, Bathroom Safety Grip No Drilling Waterproof,Grey,G9
- Suitable for large, smooth tiles: Fits tiles 4×4 inches or larger
- Easy to install and remove: Includes strong suction cups with locking latches
- No wall damage: Removable and reusable without wall damage
As an affiliate, we earn on qualifying purchases.
As an affiliate, we earn on qualifying purchases.
Importance of Grab Bars

When it comes to enhancing safety in your bathroom, grab bars are essential. They provide extra security, offering support and stability that greatly reduces the risk of slips and falls on wet surfaces.
Properly installed grab bars can support up to 250 lbs, ensuring they're suitable for various body types and abilities, while meeting safety standards. This installation promotes independence for individuals with mobility challenges, allowing them to navigate the bathroom confidently without needing assistance.
Grab bars also serve a dual purpose; they offer functional support and can enhance the overall aesthetic of your space, available in various styles and finishes.
Plus, investing in grab bars is a cost-effective home improvement that contributes to a safer living environment. Additionally, grab bars can significantly reduce the risk of falls, which are a common concern for aging individuals. By incorporating these senior safety home upgrades, homeowners can enhance mobility and independence, allowing seniors to navigate their spaces more freely. This simple addition not only provides peace of mind but also adds value to the home by making it more accessible for everyone.
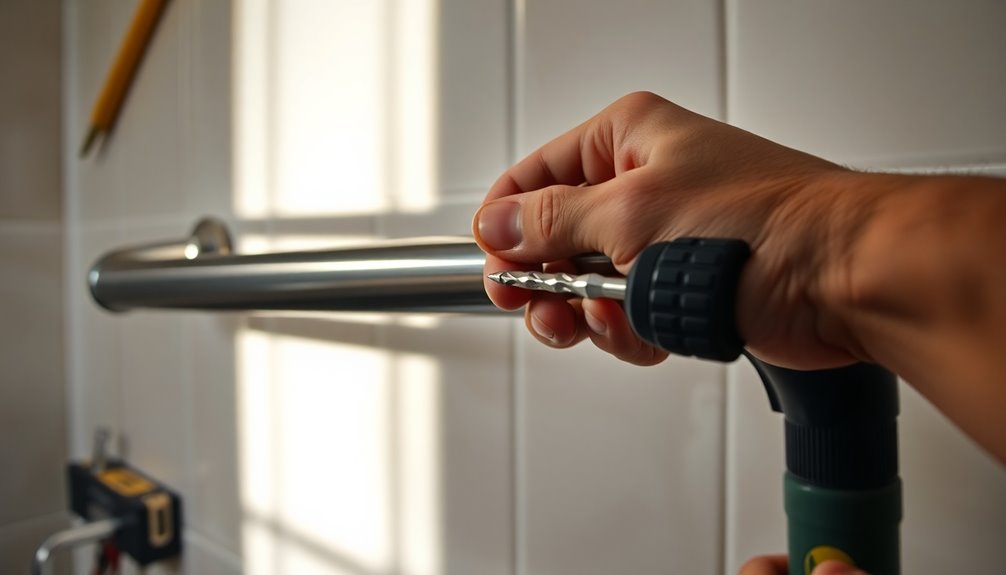
Locating and Marking Studs

To guarantee your grab bars are securely installed, accurately locating and marking the wall studs is essential. Start by using a stud finder to pinpoint the position of the wall studs. Lightly knock on the wall to confirm; a solid sound indicates a stud, while a hollow sound shows a gap.
Mark the center of each stud with a pencil, then extend these marks down to your grab bar's desired height using a level for proper alignment.
If you're working on tiled surfaces, apply masking tape to prevent your drill bit from skidding. Remember to verify adequate clearance of 1-½ inches between the grab bar and wall for safety during installation, considering spacing as you proceed.
Positioning and Fastening Grab Bars

After marking the studs, it's time to position and fasten the grab bars securely.
For effective support during entry and exit, install vertical grab bars 32 to 38 inches above the floor at the shower or tub entrance. Horizontal grab bars should be 36 to 38 inches above the finished floor within the shower for maximum stability.
Verify there's a 1-½ inch space between the grab bar and the wall for a secure grip. Use No. 10 or 12 stainless steel screws that penetrate at least 1 inch into sound wood for secure fastening to the wall studs.
Consider user height and specific needs; consulting a physical or occupational therapist can help determine the best grab bar installation locations for bathroom safety.
Securing the Grab Bar
Securing the grab bar is essential for ensuring safety and stability in your bathroom. Follow these steps for a secure installation:
- Use No. 10 or 12 stainless steel screws for mounting to resist rust and provide durability.
- Ensure all screws penetrate at least one inch into wall studs, angling them as needed for a solid connection. Avoid plastic anchors whenever possible.
- Tighten all screws according to the manufacturer's instructions to prevent any rocking or instability.
After securing the grab bar, make sure to test its strength by applying force, ensuring it can support up to 250 pounds.
Proper securing of your grab bars will give you the confidence you need for safe bathroom use.
Sealing and Testing

Applying silicone caulk around the seams of your newly installed grab bar is vital for preventing water seepage and enhancing its durability.
To guarantee a secure installation, you might also consider caulking the back of the mounting flange before installing the grab bar. This extra step helps guard against moisture ingress.
After applying the caulk, allow for a caulk drying time of 1-2 hours before you test the grab bar's stability. To test strength, pull firmly on the grab bar, confirming it can support the required weight.
Finally, wait 24 hours before exposing the area to water to allow all materials to properly set, assuring both safety and performance. Proper sealing and testing are essential for long-lasting functionality.
Frequently Asked Questions
How Should Bathroom Grab Bars Be Installed?
To install bathroom grab bars, start by locating in-wall wood studs for secure mounting.
Use heavy-duty screws and drill pilot holes with a 1/4-inch glass-and-tile bit for tiled surfaces.
Position horizontal bars 33 to 36 inches from the floor, and vertical bars 32 to 38 inches at the tub edge.
Make sure to use stainless steel screws or wall anchors.
Finally, apply silicone caulk around the flanges to prevent water seepage.
What Are Two Requirements When Installing Grab Rails in a Bathroom?
Installing grab rails is like securing a lifeline in your bathroom. To guarantee safety, you need to mount them to in-wall wood studs, which can support a significant amount of weight.
Additionally, make sure there's at least 1-½ inches of clearance from the wall for a proper grip. By meeting these requirements, you'll provide stability and confidence for anyone using the grab rails, making your space safer and more accessible.
Do Grab Bars Need to Be Installed in Studs?
Yes, grab bars need to be installed in studs whenever possible. This guarantees maximum stability and safety, allowing them to support significant weight.
You should locate the wall studs using a stud finder and mark their positions for secure installation. If studs aren't available, consider using wood blocking or heavy-duty toggle bolts.
Avoid plastic anchors or drywall screws, as they won't provide the strength necessary for safe support in wet environments.
What Is the Code for Grab Bars in a Bathroom?
The code for grab bars in a bathroom primarily follows the Americans with Disabilities Act (ADA) guidelines.
You'll need to verify the bars can support at least 250 pounds when properly installed. For best grip, choose bars with a diameter between 1 ¼ to 2 inches.
Install them 33 to 36 inches above the floor, leaving 1 ½ inches of space from the wall for a secure grip. Always mount them to studs for maximum stability.
Conclusion
By installing grab bars, you're not just adding safety; you're creating a sturdy lifeline in your bathroom oasis. With each secure placement, you're weaving a tapestry of comfort and confidence, allowing you to navigate your space with grace. As you seal the final touches, envision the peace of mind that envelops you, transforming your bathroom into a sanctuary where slips and tumbles are mere whispers of the past. Embrace the beauty of security—your haven awaits.