Google Search Console is a concept every business must understand. Therefore, learn it to move your business in the right direction. More importantly, your business will grow beyond geographical boundaries.
It is because this web service of Google affects the output of your SEO campaign. As a result, you must learn about it. In order to help you, we have decided to improve your knowledge about it.
Also read: The Difference Between On-Page And Off-Page SEO
Who Should Use Google Search Console?
There are several groups of individuals who can benefit from utilizing the features of Google Search Console.
This includes:
- Website owners and administrators who want to improve their search engine visibility.
- SEO professionals and digital marketers seeking data-driven insights.
- Web developers aim to enhance website performance and user experience.
- Business owners want to monitor their online presence.
- Anyone interested in understanding how their website appears in Google’s search results.
Also read: 15 Simple Tips For Becoming An SEO Expert – A Complete Guide For Beginners
Understanding Google Search Console
This is the first thing you should learn about it. Google Search Console was previously known as Google Webmaster. It is a web service of Google that allows webmasters to check:
- Indexing status
- Search queries
- Crawling errors
- Optimize the visibility of their websites.
This web service is the most reliable way for a website owner to communicate with Google. In a word, you can use it for the following:
- To verify the ownership of your website.
- In order to provide the sitemap of your website to Google.
- For generating and checking the Robots.txt file.
- Access to reports about traffic and link details is another benefit.
- Furthermore, you can get complete information related to schema and rich snippets.
- A complete overview of search performance is possible as well.
- Requests to get updated pages indexed can be submitted.
Google also uses it in the event that your website is hacked or penalized. The search engine uses it for sending you a monthly newsletter as well. It must be remembered that the newsletter tells you about the monthly performance of your website.
Also read: 7 Complete Best Free Traffic Sources for Marketing Your Website
Steps To Identify Website Ownership With Google Console
It is an essential as well as the first step of every digital marketing strategy. Now, this is the first and foremost thing you must bear in mind.
Step 1:
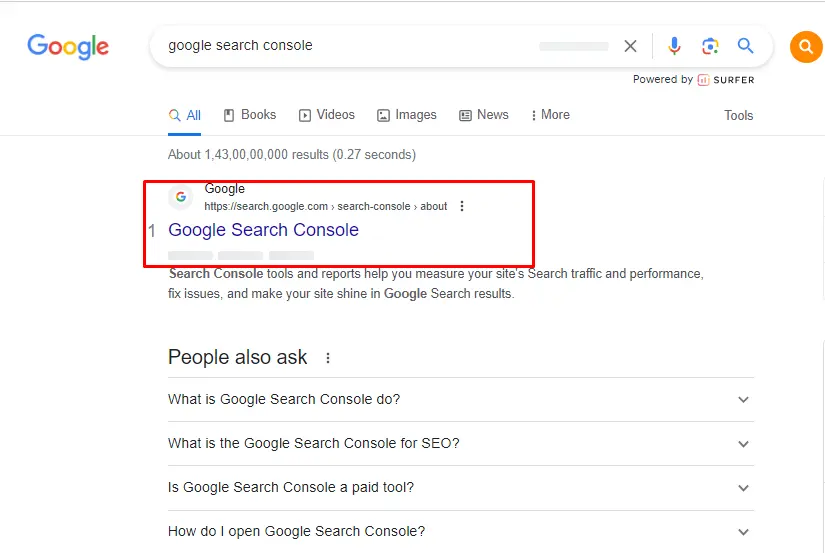
Search for “Google Search Console”.
 Step 2:
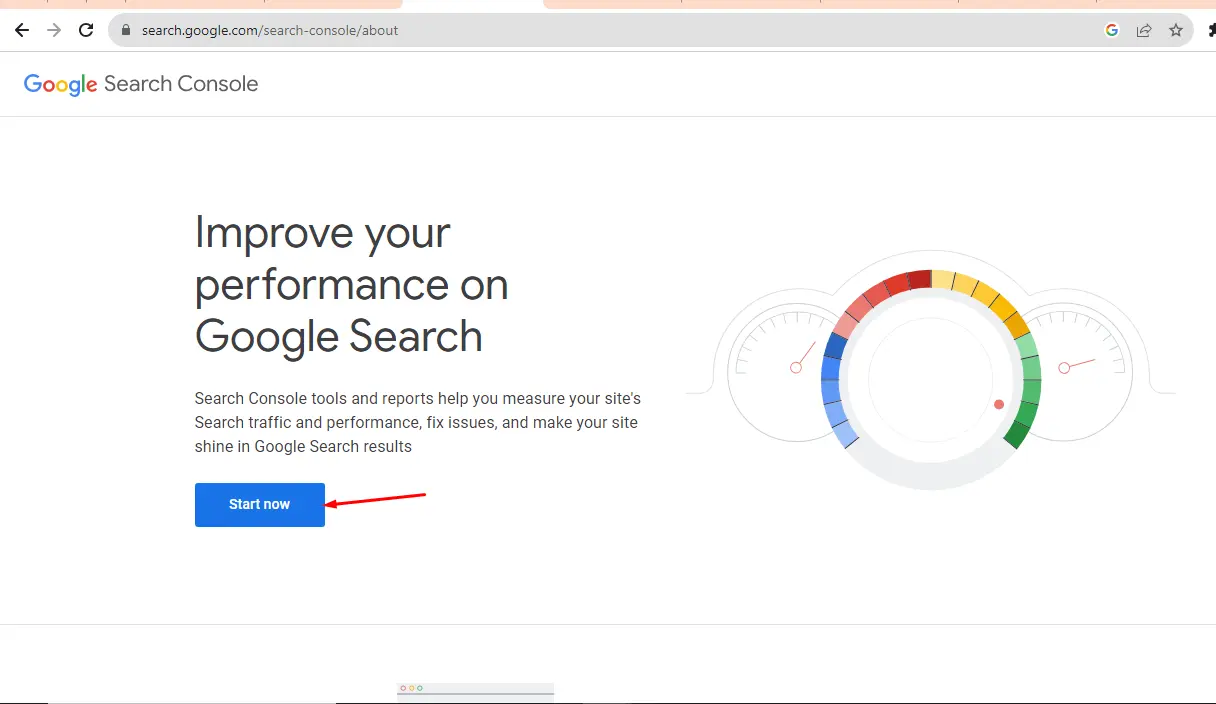
- Click on the start now button.
 Here we have two different methods.
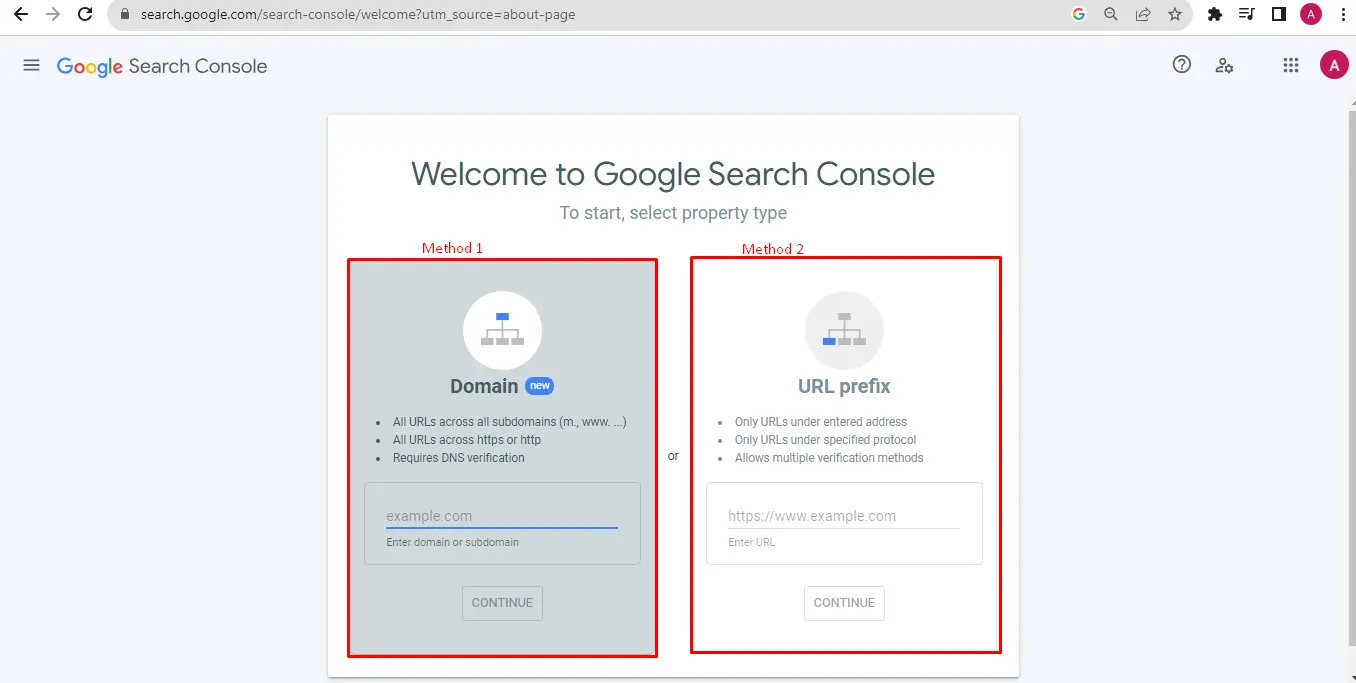 The first one is by Domain Name
- The second thing is by URL Prefix Method
Let’s check both methods one by one.
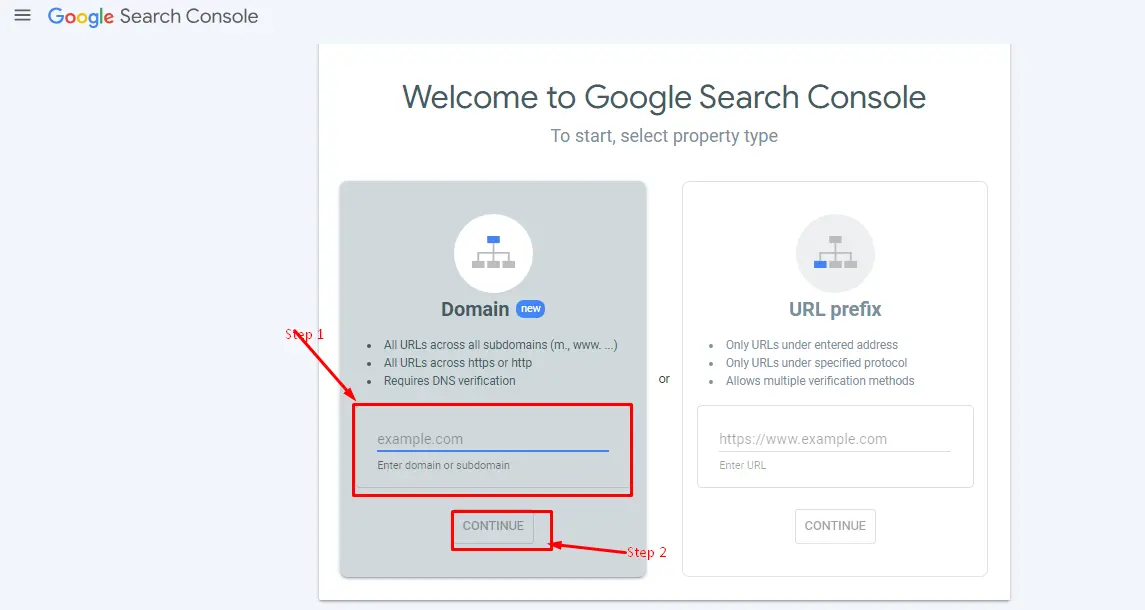
Method 1: By Domain
Step 1:
Enter your domain or subdomain name in the box shown in the image and then click on the continue button.
 Step 2:
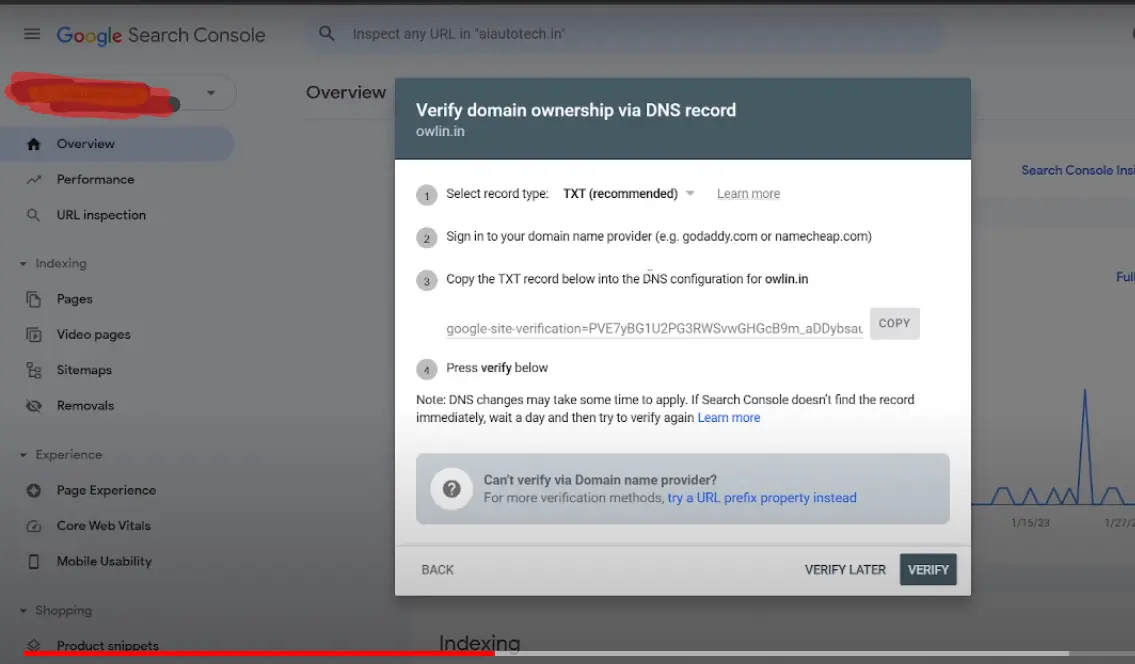
Here you will be told about setting DNS TXT Record in 4 very easy steps.
 For this you have to open the panel from which you have bought your domain name.
To add a TXT record in Namecheap, follow these steps:
- Sign into Namecheap’s control panel.
- Go to “Domains” under “Domain & Hosting.” All of the domains you own and the hosting services you use will be shown here.
- Select the “Manage” button next to the domain you want to move.
- To access advanced domain settings, click the “Advanced DNS” button.
- Select the domain or hosting account that requires a TXT record, and then click the “Add” button.
- To add a new record, go to “TXT Record” and click it.
- Include the hostname and port number in the record’s information.
- Simply click “Add TXT Record” and check the data on the next screen. If the data you’ve supplied is correct, you may proceed with the transaction.
Note: If you have a domain from any other domain provider than Namecheap, the steps will remain almost the same, still you can do this easily by searching on the internet. If you have linked your domain with hosting, then you can do this very easily with a Cpanel also.
Method 2:
The second method to get website ownership in Google Search Console is by the URL prefix method.
One thing you have to pay special attention to is the protocol and subdomain of the url.
For example if you want to show “www.example.com” on the internet and you just want a ssl certified website, then you should enter “https://www.example.com/” in the textbox under the URL prefix method.
In this method, you get the option to verify the domain name in 5 different ways.
The first of which is named DNS which we have already shown you.
The second and third method in this is to do it through Google Tags and Google Analytics respectively.
But applying them is a little more difficult than the two methods mentioned at the end. That’s why we are going to tell you only the fourth and fifth methods i.e. HTML file upload method and meta tag methods here.
HTML file Upload
This approach requires uploading an HTML file to your website’s root directory. Using FTP/SFTP clients or cPanel File Manager to upload the file is straightforward, but you must have server access.
Step 1: Download the Verification File
If you go to the Recommended verification technique page in Google Search Console after adding your site, you’ll see a link to download an HTML verification file.
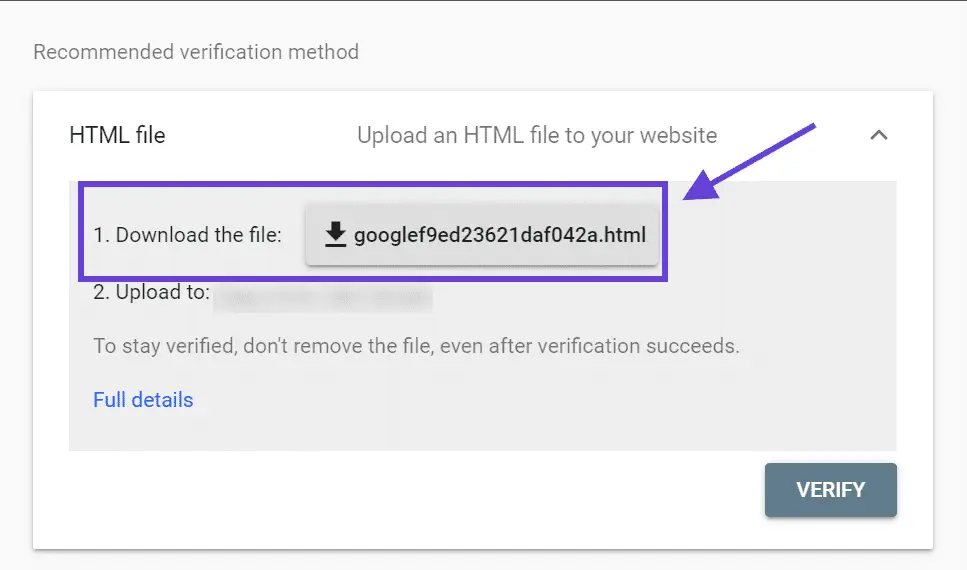 Select the file and click the Download option. Put this document away in an easily accessible location; you’ll need it in a flash.
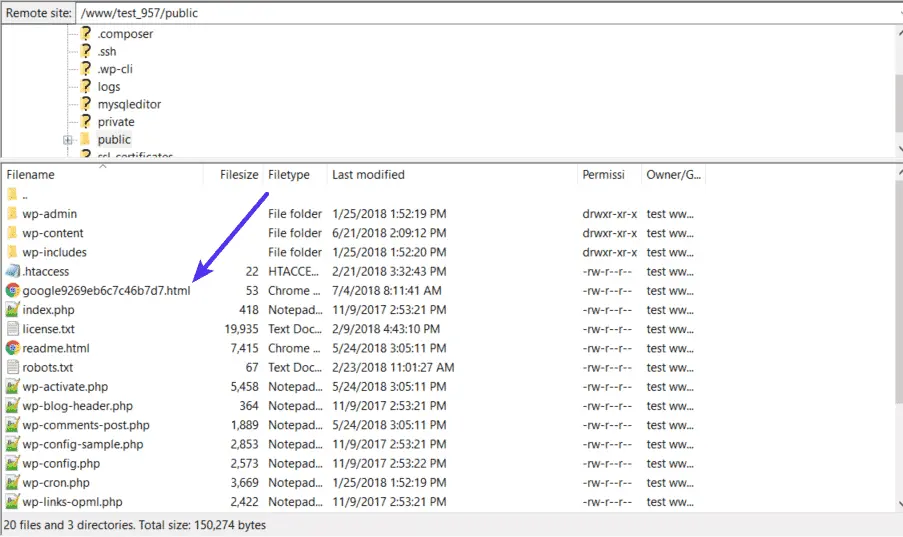
Step 2: Upload the File via SFTP
The next step is to establish an FTP or SFTP connection to your website.
The file you obtained from Google should be placed in the root folder of your site (the folder that includes the wp-content folder, wp-config.php, etc.) after the connection has been established successfully.
The uploaded file ought to resemble this upon completion:
 Return to Google Search Console after the file has been placed in the root folder of your site. Now is the moment to double-check your property.
Step 3: Click the Verify Button in Google Search Console
After the file has been added to your site, return to Google Search Console and click the VERIFY option. If you place a file on your server, Google Search Console will find it and use it to confirm that you control the website.
The same approach may be used to validate a CDN in Google Search Console. Having your content delivery network (CDN) verified in Google Search Console will let Google crawl and index your picture files.
- HTML Tags
The simplest way to implement HTML tags is to include a meta tag in the <head> of your site’s HTML. To do this with WordPress, you can:
- Simply inserting the tag into the header.php file of your child theme
- The header is injected using a plugin.
Step 1: Copy the Meta Tag
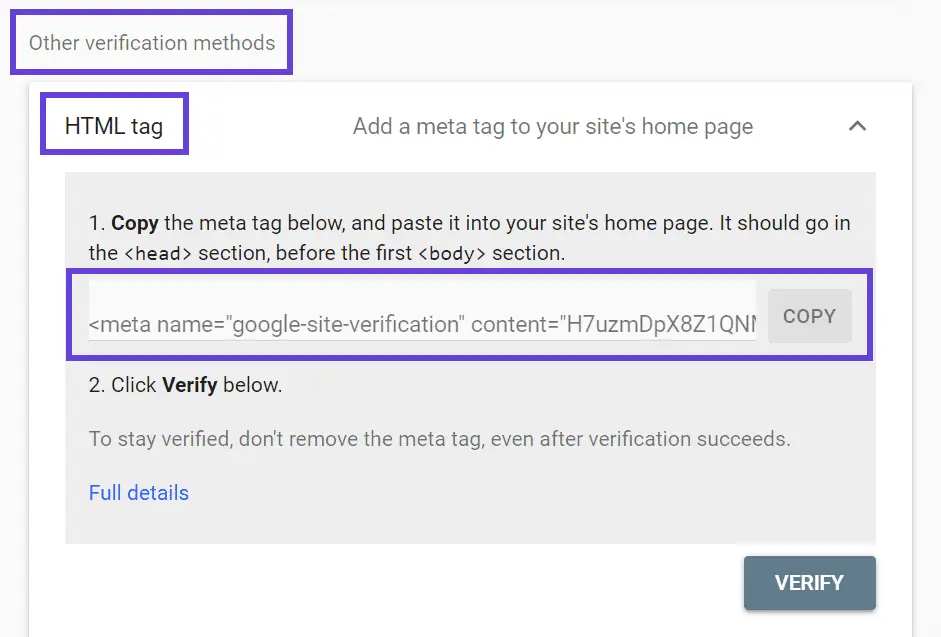 Under the Google Search Console interface, the meta tag may be found under the Other verification techniques section:
The meta tag in the box can be copied by clicking the COPY button. Let’s get it installed on your WordPress site right now!
Step 2: Add the Meta Tag Using Insert Headers And Footers
The next step is to download and activate the free Insert Headers and Footers plugin. Go to your site’s settings and then to Insert Headers and Footers. In the Scripts in Header box, add the following meta tag.
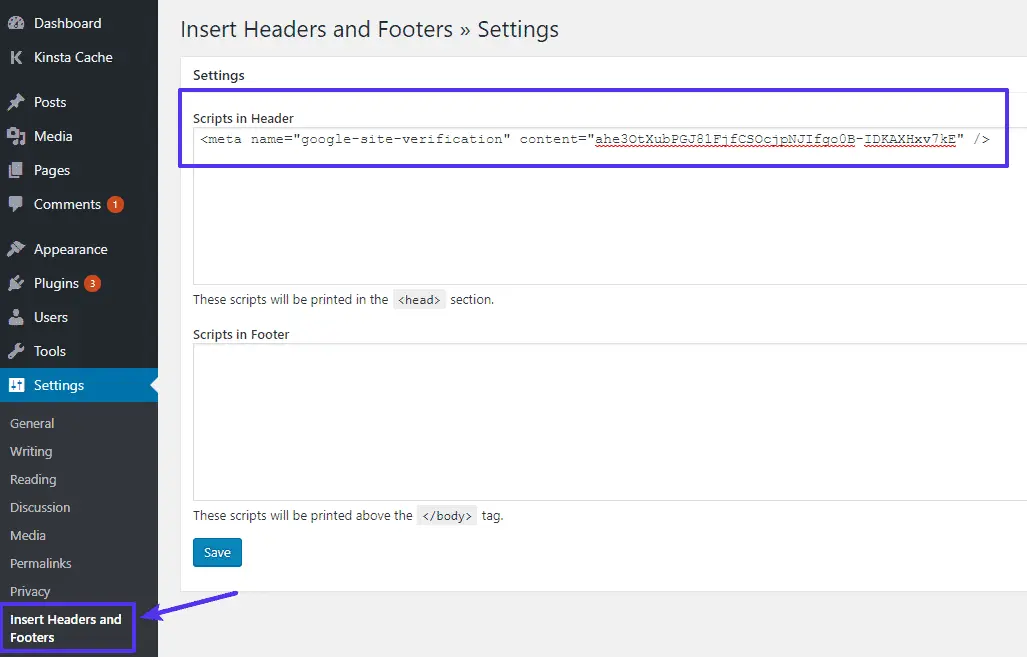 When you are through customizing your website’s header, click the Save button. If you’re not familiar with modifying WordPress core files, we suggest using a plugin instead of manually adding the meta tag.
Return to the Google Search Console interface and choose the VERIFY option to complete the procedure. Google Search Console would recognize your site when you included the code.
Also read: 10 SEO Hacks To Improve Your Website’s Ranking in SERPs
Reasons For You To Link Your Website With It
Performance Tracking
You must track the performance of your website frequently. The process is easy. Follow the steps given below:
- Click the Performance option available in the sidebar.
- You will access the performance data of your website.
- You can export the performance report using one of the following export methods:
- Google sheets
- Excel file
- CSV file
- Do not forget to apply filters before downloading the performance report. It is because these filters help you access only the data that matters to you.
- The search Type filter helps you determine the form of data you want to download.
- The date range is another filter you must keep in mind while downloading the data.
The performance data of your website is finally ready. All things considered, the data appears on your screen in the form of Total clicks, Total impressions, Average CTR as well as average position.
The performance tab offers access to some more useful information in addition to the information you download.
Check the Queries tab so that you know about the keywords impacting your website performance in SERPs.
For instance
- The list of keywords your website is ranking for in SERPs.
- Your website’s position in SERPs on a particular keyword.
Furthermore, the Pages tab informs you about the web pages ranking in SERPs. Another important thing you know is their position in SERPs. The data includes the performance of keywords as well.
The countries tab yields information about the performance of your website in all countries. Again, the information extracted includes its position in SERPS and more. The Devices tab informs you about the performance of your website on a particular device type.
Checking the dates tab is a great way to know the performance of your website on all metrics on a particular date. It is also a great option to know the same thing during a particular week, month, or even a year.
You are on your way to leveraging the potential of Google Search Console to the fullest. The credit goes to the access that you have to the data much needed.
Introduction To Coverage Tab
 What does it tell you? It is one of the points most digital marketers have often overlooked. It is a tab found in the Index section. The tab tells you about many important things. For example:
- The way Google is viewing your website.
- The number of web pages Google has indexed (Your website).
- The count of web pages with errors on your website.
- How many web pages have received warnings.
- The reason for errors or warnings.
Given these points, understand the value of knowledge about it. Your knowledge about it impacts the performance of your website in SERPs significantly.
Benefits Coverage Tab Offers
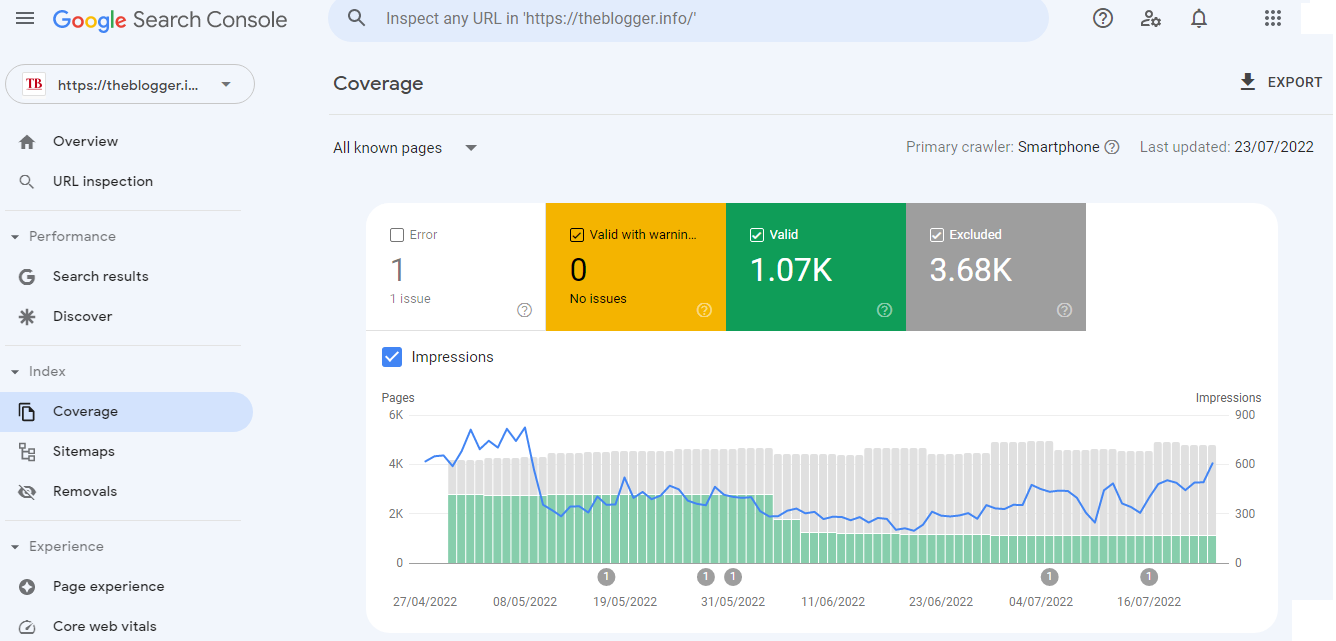
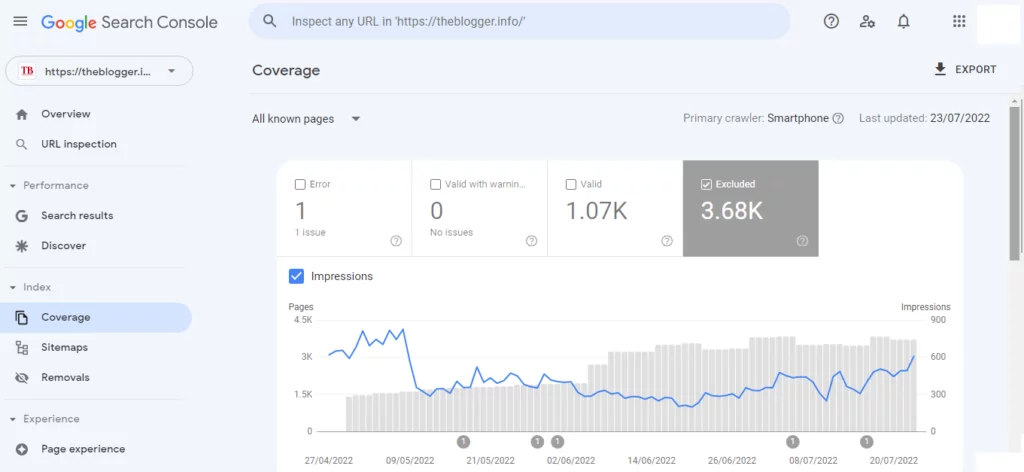
Login and click the tab. The first thing you will notice is the Export button. It is like the Export button you found in the Performance tab.
The functionality of this button is comparatively different. The difference is between the data the two allow you to access. Again, you can download the data in the form of Google Sheets, Excel File, or a CSV file.
The Last Updated feature below the Export button is equally important for you. Regular attention to this feature is equally important. This feature tells you the date when you last changed, edited, or updated anything on your website.
The next you will see is the Primary Crawler Information feature. You may see the PCI (Primary Crawler Information) Indicating Smartphone option.
What does it mean? In other words, your website is being crawled on smartphones. For this reason, make sure you design and optimize your website for smartphones. The display of Smartphones term by Primary Crawler information feature is compelling evidence of it.
You will see four more equally important boxes. One of them is the Errors box. This box shows the following:
- The number of web pages having errors.
- The count of web pages Google has not indexed.
- The exact counting of web pages Google has not even seen.
- The types of errors in the web pages.
The additional graph below the box displays the errors in all web pages.
Valid With Warning is the second box in this list. The box shows the counting of web pages with warnings.
Google does not know whether you committed these errors by mistake or unknowingly. You ought to fix all errors in these pages instantly. Taking everything into account.
As you can see, the color of this tab is Yellow for you.
Valid Tab is another tab for you. The tab appears in Green color to indicate to you the number of error-free web pages. Therefore, Google has seen as well indexed these web pages.
Google is displaying these web pages in SERPs at the present time. Hence, you do not need to do anything with those web pages. Remember, these pages can be outside the sitemap as well.
Meanwhile, pay some attention to the Excluded tab. The tab offers information about additional information in the form of numbers. The numbers in this tab refer to the number of web pages Google has not indexed.
Either Google has not indexed these web pages deliberately or due to some error. You can check these web pages again and resubmit for the purpose of indexing. Google tells you the reason for not indexing these web pages at the instant.
Time To Throw Some Light On The Errors Tab
What Does Errors Tab Show?
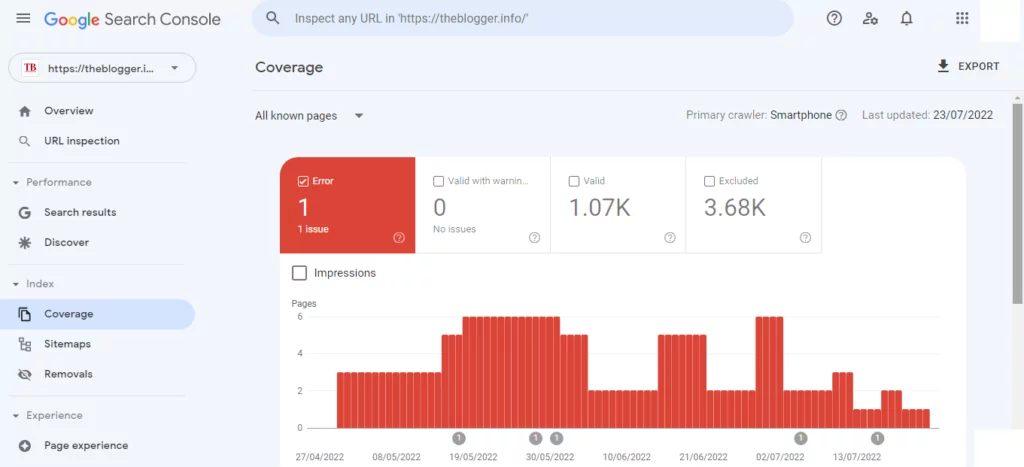 Google Search Console may show you some fluctuation in the bar chart below the tab. Big bars refer to more errors whereas small bars refer to less number of errors. Don’t you see any bars? Great! Everything is alright.
An additional thing you will notice below is the list of errors. The list informs you about multiple things.
- The number of errors and the type of errors.
- The counting of pages with errors.
- URLs to pages of your website with errors.
Do you want to access links to pages having errors? You will have to click the error type option for this purpose. Finally, you will be able to see the list of web pages with errors.
Since you have accessed the list of web pages with errors, it is time to check them. Click the error you want to fix using one of the following options:
- Inspect URL
- Test Robot.txt Blocking.
Selecting the second option will check if your URL is blocked by Robot.txt or not. On the other hand, the Inspect URL option will retrieve data from the search console. The data retrieved shows the error affecting the selected web page.
The same offers you access to some more invaluable information as well. For instance:
- Is the web page in the sitemap or outside of it?
- Information related to crawling as well as indexing.
Click on the Performance tab and paste your URL in the search so that you can inspect the URL of your choosing.
What Does Excluded Tab Show?
 Check this on priority after working errors in the web pages of your website. It provides you access to all excluded web pages after you click on this tab.
Do not worry if the list presented before you shows errors in web pages. It is because you may not have to work on all web pages. Instead, you can check the URLs. The check will help you determine whether a page selected needs rework or not.
Do you know what is more important for you to know about the tab? You can use it for troubleshooting some web pages as well. You can resubmit the page to Google for the purpose of indexing once you fix the errors found in it.
Google has disabled the Request Indexing Feature for some time. However, you need not worry about anything as there are some other ways as well.
Filter Dropdown Option
 This is another specialty of the topic being discussed. Click the dropdown menu and select All Known Submitted Pages in order to check the pages you submitted through your sitemap.
Did you submit multiple sitemaps? Do you want to check the information of all of them? Fine! Just click the dropdown menu and select the sitemap of your choosing. The feature is amazing for websites having millions of web pages.
Sitemaps Option
 This is another key concept related to the topic of discussion. What exactly is it? Does it matter? Many such questions must be arising in your mind.
You need it so that you can inform Google about pages, videos, and other files available on your website. At the same time, it makes Google understand the relationship between all files. How can you underestimate its value then? All in all, the file has importance for your business.
Its Types
There are two different types of it. One of them is the XML Sitemap whereas the second is HTML Sitemap.
Link only XML Sitemap. Google does not process HTML Sitemap at the present time. The option is available under the Index menu.
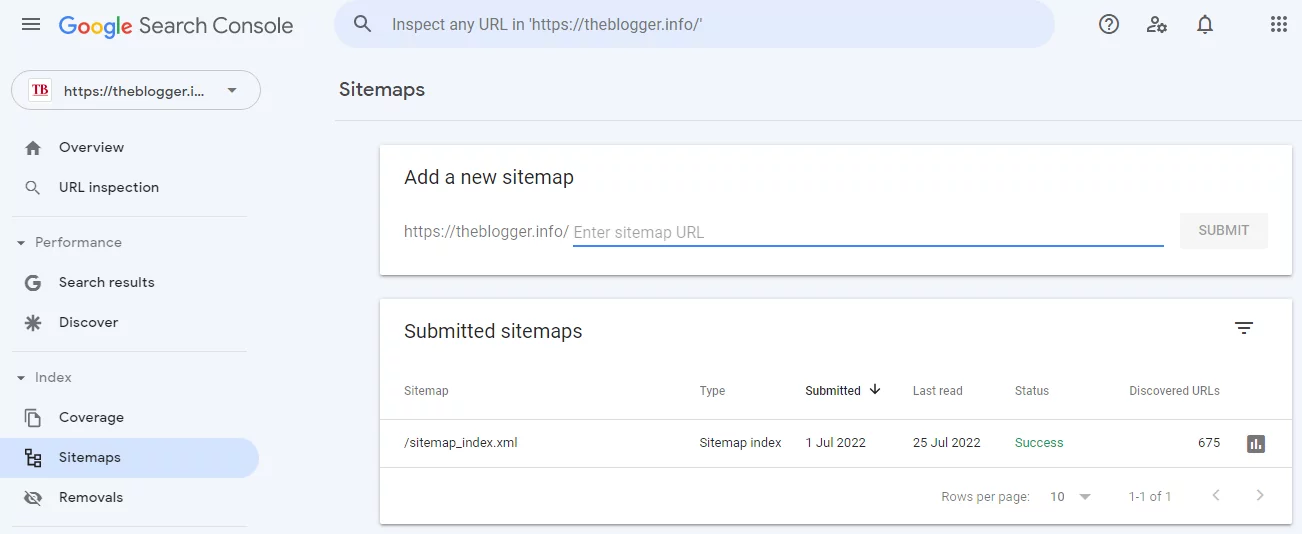
Click the option. Enter the URL under Add A New Sitemap option. Always remember to add the .XML extension to the URL entered. You are all set to submit your sitemap after this.
At times, you may see some part of your website URL already typed there. What if you do not see the initial part of your website’s URL already typed there?
Domain property is a naked domain name. Anything added to the naked domain falls in the category of URL Prefix Property. Anything can be added before the URL. You deserve full space to accomplish the task.
On the other hand, the initial part of the URL is pre-written for you. It falls in the category of URL Prefix Property. Finally, click the submit button after you have entered your website’s URL.
You may encounter a “Couldn’t Fetch Error” during the processing. Don’t worry! The issue can be solved immediately. It just means that the Search Console has not been able to access the Sitemap.XML.
It happens due to the reasons mentioned below:
- First of all, your Sitemap file is missing or unavailable.
- Secondly, something is wrong with your Sitemap file.
It is easy to check the issue. Open a new tab in your browser. Just copy and paste the Sitemap URL after this. See if it opens or not. In case you are short of luck, check for errors in your sitemap file.
Your sitemap file may refuse to open. Furthermore, it may not open properly. A corrupt Sitemap file is another reason for it. Try another method if everything is fine according to the first method.
Again, make sure you have not blocked your Sitemap.XML file for the search engine via Robots.txt. In case it is blocked, Google will not be able to reach it and fetch it then. In this case, you are bound to face this issue.
Temporary is another reason for it. Since it is a backend issue from Google, you are left with no choice but to play the waiting game. You should wait at least 4 to 5 hours. The search engine will fix the issue in the meantime.
However, this feature allows you to submit multiple sitemaps too. It is also a way to check all types of information relevant to the sitemaps submitted. The information available for you includes the following:
- The date of submission.
- The previous reading of Sitemap.
- Sitemap access status.
- The total number of URLs found on the site?
The last option available is the Coverage option. Again, clicking the option will redirect you to the Coverage tab.
Also read: 15 Simple Tips For Becoming An SEO Expert – A Complete Guide For Beginners
What Happens If You Accidentally Submitted The Wrong Sitemap?
You may want a solution to this problem as soon as possible. Do you wish to remove the sitemap related to an old plugin? Don’t you know what to do? Most first-time website owners usually face this issue. Google does not offer any direct solution to this problem at the present time.
We suggest you read Google Search Console Complete Tutorial 2023 further to get rid of this problem. The solution suggested here is indirect. Follow the steps given below:
Click the Sitemap file first. You will access the following information after this:
- Last read information.
- Total number of URLs discovered.
- Index Coverage Direct Button.
You will then access information about the following:
- Information of all URLs mentioned in the sitemap
- Information about links to internal Sitemaps.
- Then you will access an XML file. This file may not have any link to your website. Instead, the list of links available in the file may be related to multiple Sitemaps submitted. This is what is more important for you to understand.
- Since it contains an index of other sitemap files, it is called the Index.
- Another key information you will find in it is the list of URLs submitted in all sitemaps.
- Finally, select the sitemap you want to remove.
- Click the three dots available at the top of your screen.
- At last, click the Remove The Sitemap option.
Finally, your sitemap is removed. Submitting a sitemap is an important thing. It affects your website’s ranking in SERPs in a positive way. It indicates the growth of your web pages and website positively.
Removal Tools
These tools are different from disavow tools. You get this set of tools as a part of the Index section. The following three are the parts of the removal tools:
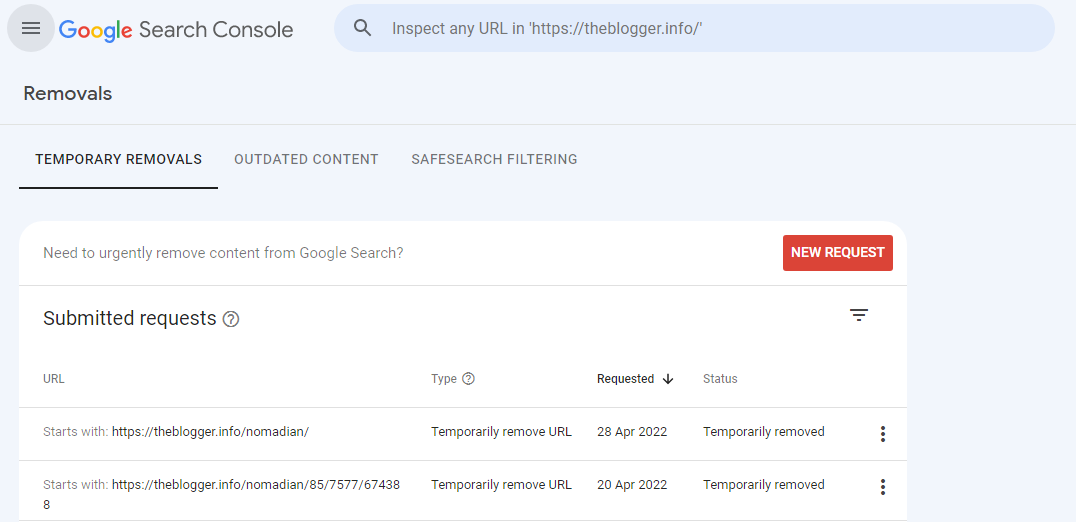
Temporary Removals
 Google allows permanent removal using No Index Tags. It is because the largest engine in the world does not offer a direct feature for permanent removal.
The duration of removal of pages is important to realize for you. In other words, you can get indexed pages of your website for six months.
What is the process? This must be one of the thousand questions running inside your brain. Just follow the steps given below:
- First, click the New Request option visible on your screen.
- Second, make your choice from the options below:
- Temporarily Remove URL.
- Clear Cached URL.
We are first going to talk about the Temporarily Remove URL option. This feature offers two options mentioned below:
- Remove this URL only.
- Remove all URLs with this prefix.
Just enter the URL in addition to making your choice from the radio buttons. Another key thing you should know is the thing you can remove with it. It allows you to remove the following for six months:
- The URL.
- The cache version of the URL.
- The snippets Google has recorded.
It must be remembered that your selection of radio buttons matters. The selection of the first button removes only the URL entered.
The selection of the second button wipes out all types of records related to the URL entered. It removes all URLs with the same prefix as well. Submit the request only after you have double-checked everything.
You will then see a list of submitted requests. The list allows you to cancel the removal of URLs anytime.
Outdated Content
This tab does not offer you any feature. It presents you with a list of URLs having outdated content. This happens when readers report your content as outdated.
Don’t you see anything in this tab? You then have a big reason to smile. It means everything is fine with your website.
Safe Search Filtering
This tab also does not offer you any features. It is used in order to access the list of URLs containing adult content.
You can be happy if you do not get to see any URL in this tab. In other words, your content does not fall in the category of adult content.
That’s enough about Removal Tools. It is now time to move on and talk about the next concept.
Disavow Tools
This specialty is different from the one discussed above. It is equally important for webmasters. You can leverage its potential to get rid of harmful backlinks from your website.
Webmasters cannot ignore the importance of backlinks. Backlinks help Google find your website as well as the content. Furthermore, backlinks help Google understand your content.
However, normal SEO has more importance than backlinks. It is because just a couple of high-quality backlinks are enough to help Google find your website, and content and understand the intent of your content. Hence, you need to focus more on SEO instead of getting unlimited backlinks.
Google too has understood it over time. The search engine has developed some algorithms by the same token. Another key Google has understood is the way bad backlinks harm websites.
The issue encouraged the search engine to launch a reward system. The reward system rewards websites with high-quality backlinks. But Google has not developed any penalty program to penalize websites flooded with harmful backlinks.
You are still not advised to think about using the following:
- PBN Links
- Paid Links
- Link Schemes
Use this specialty only to remove bad backlinks from your website. Disavow Tools cannot be accessed directly in the Search Console. Instead, you can use one of the following links:
- New Disavow Tool- https://search.google.com/search-console/disavow-links
- Old Disavow Tool- https://search.google.com/search-console/disavow-links?utm_source=wmx&utm_medium=deprecation-pane&utm_content=disavow-links-main
Click on the link of your choice in order to access disavow tools.
You must see the link carefully before proceeding. You will notice the search console term as a part of the link. It means that the concept is a part of the whole thing.
Again, you are advised to focus on the location and grouping of all menus and options.
You should use the new version instead of the old version. It is because Google is about to abandon the old version.
You are now advised to use the following steps:
- Login using your Gmail credentials.
- Select your website from the dropdown list.
Make sure you select the right property before uploading the Disavow file.
The file being uploaded must be in .txt format.
Do you want some help in order to generate the disavow file? SEMrush and Ahrefs are the tools you need then. These tools allow you to generate the disavow file automatically.
How about creating disavow files on your own? The process is easy in this case.
Just follow the steps written below:
- Just open the notepad.
- Paste all backlinks that you want to disavow.
- Do not type more than one backlink in one line.
Do you want to disavow all backlinks coming from a specific source or website at once? In this case, type for it as mentioned below:
- Type Domain first.
- Secondly, apply colon.
- Third, is the website name.
For instance:
Domain: example.com
The instruction allows you to disavow all harmful backlinks coming from a third party. Furthermore, it allows you to disavow all backlinks at once.
- The size of your file must not exceed 2MB.
- The file should also not contain more than one hundred thousand lines.
- Do not forget to save the file in .txt format before uploading.
- Finally, upload the file.
You will get to see an error window on your screen only if the file being uploaded has an error. In case everything is right, you will the following options:
- Download file – to download the file.
- Cancel Disavowals – to cancel your disavow request.
- Replace – for replacing the old disavow file with a new disavow file.
These are two offensive options of Search Console in order to remove bad backlinks from your website.
FAQs
 How does Search Console help a digital marketer?
Google Search Console is a free web analytics tool that aids digital marketers by measuring search traffic, identifying and resolving website issues, and tracking the performance of search engine optimization on Google.
What happens when you submit a sitemap to Google?
When you submit a sitemap to Google, it informs Google about the important pages and files in your site, along with important information like the page’s last update and any alternate language versions.
What is the difference between Google Search Console and Google Analytics?
Google Analytics provides user-oriented digital marketing analytics, while Google Search Console provides insights into search engine behavior and technical optimization improvements.
How can I use Google Search Console to improve my website’s SEO?
To enhance your website’s SEO, verify site ownership, ensure Google can access your pages, review mobile usability errors, consider submitting a sitemap, and monitor your site’s performance.
Who should use Google Search Console and why?
Google Search Console is beneficial for SEO specialists and marketers to monitor website traffic, optimize ranking, and make informed decisions about search results.